
Pruning roses in autumn is a biological betrayal that sentences them to death by triggering a fatal growth spurt just before winter.
- It breaks the plant’s essential dormancy cycle, forcing vulnerable new shoots that will be obliterated by the first frost.
- It creates open wounds that become entry points for fungal diseases like canker, which thrive in damp autumn weather.
Recommendation: All major pruning must wait until late winter or early spring. Autumn work is strictly limited to light tidying and damage control to prevent wind rock.
Every gardener feels the urge in autumn. As the garden winds down, the desire to “tidy up” is strong. You look at your leggy roses and think a good, hard prune will set them up for a vigorous spring. This is a catastrophic, albeit common, mistake. While well-intentioned, autumn pruning is not just bad timing; it is a fundamental misunderstanding of a rose’s biology. It’s an act that actively undermines the plant’s natural preparation for winter and sends a hormonal signal that encourages a fatal flush of growth.
The standard advice is simple: “wait for spring.” But this advice often lacks the crucial “why.” The truth is that a rose bush is a complex organism that follows ancient rhythms of growth and dormancy. Pruning is a powerful message. In spring, it says, “Grow!” In autumn, it sends the same message at the worst possible moment. The tender new stems it produces have no time to harden off before the first killing frost arrives, leading to severe dieback that can weaken or kill the entire plant. This is the primary reason why so many enthusiastic gardeners find their prized roses dead or dying come spring.
This guide moves beyond the simple rules. We will dissect the science behind this fatal error, exploring the systemic consequences of mistimed cuts. We will cover the non-negotiable protocol for tool hygiene to prevent widespread disease, the precise cutting techniques that encourage blooms versus weak growth, and the modern understanding of wound care. By understanding the rose’s internal clock and its response to your actions, you will transform from a gardener who follows rules to a master pruner who works in partnership with the plant, ensuring its long-term health and a spectacular floral display year after year.
This article details the essential principles and techniques that separate a novice from a master pruner. The following sections provide a structured approach to understanding not just what to do, but why you are doing it.
Summary: Why Pruning in Autumn Can Kill Your Roses Before Spring?
- The “Dirty Shears” Mistake That Spreads Disease to Your Whole Orchard
- Thinning Cuts vs Heading Cuts: Which One Encourages Fruit Growth?
- To Seal or Not to Seal: Should You Paint Tree Wounds?
- Why You Get No Apricots if You Prune Off the Spurs?
- Powdery Mildew: How to Stop It Spreading to Your Cucumbers?
- Open Center Pruning: How to Get Sun into the Middle of Your Peach Tree?
- Hedges vs Fences: Which Protects Delicate Plants Better from Wind?
- Deadheading: How to Get a Second Flush of Flowers in Late Summer?
The “Dirty Shears” Mistake That Spreads Disease to Your Whole Orchard
Before a single cut is made, the master pruner addresses the greatest threat: systemic contamination. Using dirty tools is not a minor oversight; it is agricultural malpractice. Your pruning shears are a surgical instrument, and moving from one plant to another without sterilization is like a surgeon using the same scalpel on multiple patients. Fungal spores and bacteria responsible for diseases like black spot, canker, and powdery mildew are invisible and reside on plant debris and sap left on the blades. One cut on a subtly infected plant is all it takes to turn your shears into a vector, methodically inoculating every other rose in your garden.
The consequences are devastating. A healthy rose collection can be compromised in a single afternoon. The open wounds created by pruning are perfect entry points for these pathogens, especially in the damp, cool conditions of autumn. What was meant to be a health-giving exercise becomes an epidemic-spreading event. This is why the most important pruning rule has nothing to do with cutting and everything to do with hygiene. The discipline of cleaning your tools between each and every plant is non-negotiable. It is the foundational practice that protects your investment and the long-term health of your garden.
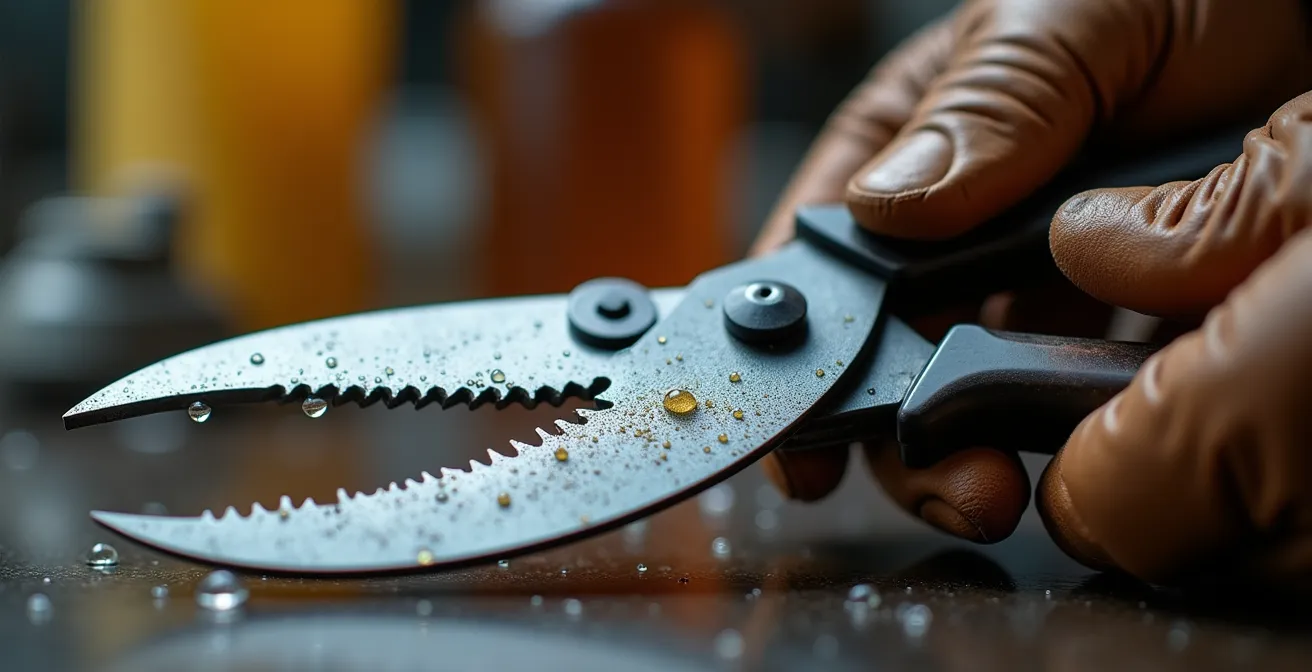
As the image clearly shows, proper disinfection involves more than a quick wipe. It requires removing all physical debris before applying a sterilizing agent like isopropyl alcohol. This ensures the agent can make direct contact with the blade surface, neutralizing any hidden pathogens. This simple, repetitive act is the hallmark of a professional and the single most effective way to prevent a self-inflicted disaster.
Your Essential Tool Disinfection Protocol
- Debris Removal: Use a wire brush or steel wool to meticulously scrub off all dirt, sap, and plant residue from your tools.
- Sterilization: Thoroughly wipe the blades with a cloth soaked in isopropyl alcohol (70-100% concentration). This must be done between each individual plant.
- Deep Cleaning: For known disease outbreaks, soak tools for 30 minutes in a solution of one part bleach to nine parts water.
- Rinsing and Drying: After using bleach, rinse the tools thoroughly with clean water and dry them completely to prevent the corrosive solution from damaging the metal.
- Corrosion Prevention: Apply a light coating of camellia oil or similar machine oil to the clean, dry blades. This prevents rust and keeps the tool in optimal condition.
Thinning Cuts vs Heading Cuts: Which One Encourages Fruit Growth?
Once your tools are sterile, you must understand the language of pruning. There are only two fundamental types of cuts: thinning cuts and heading cuts. Each gives the plant a completely different instruction, and using the wrong one will lead to a weak, unproductive structure. A thinning cut removes an entire branch or cane back to its point of origin on a main stem or to the ground. This is a surgical removal. Its purpose is to open up the center of the plant, improve air circulation to prevent disease, and direct the plant’s energy into the remaining canes, resulting in fewer but larger, higher-quality blooms.
A heading cut, by contrast, shortens a branch, cutting it back to an outward-facing bud. This cut stimulates the buds just below the cut to break and grow, promoting a denser, bushier plant with more branches and, consequently, more flowers. However, these flowers are often smaller and on weaker stems. The choice between these two cuts is entirely dependent on your goal and the type of rose you are pruning. Confusing them is a classic novice error. For example, using heading cuts on a Hybrid Tea rose that requires an open, vase-like shape will create a congested, disease-prone mess of weak growth in the center.
The proof of this principle is clear. In a landmark study, David Austin Roses demonstrated the power of the right technique. Their research showed that established English shrub roses pruned with a focus on thinning cuts to maintain an open structure produced 40% more flowers than those pruned only with heading cuts. This highlights a critical truth: to get more, you must first take away.
Case Study: The David Austin ‘Four Ds’ Rule
David Austin’s approach, now an industry standard, begins with what they call the ‘four Ds’. Before any shaping cuts are made, the pruner must remove all dead, dying, damaged, and diseased stems. This initial thinning is not about aesthetics; it is about removing non-productive and potentially harmful wood, which immediately improves the plant’s health and reveals its true framework. This strategy, combined with thinning cuts that reduce flowering shoots to 12-18 inches from the base, is the foundation for the exceptional performance of their roses.
This table illustrates how to apply these cuts for optimal results on different types of roses.
| Cut Type | Effect on Growth | Best for Rose Type | Result |
|---|---|---|---|
| Thinning Cuts | Removes entire branch to base | Hybrid teas, Floribundas | Opens center, increases air flow, larger blooms |
| Heading Cuts | Shortens branch to outward bud | Landscape roses, Shrub roses | Promotes bushiness, more blooms on shorter stems |
To Seal or Not to Seal: Should You Paint Tree Wounds?
One of the most persistent myths in gardening is the need to “protect” a pruning cut by painting it with a wound sealant. For decades, gardeners were taught that leaving a cut exposed was inviting disease and decay. Modern plant science has proven the opposite to be true. A plant’s best defense is its own natural ability to heal. When a branch is correctly pruned, the plant initiates a process called compartmentalization. It forms a protective layer of callus tissue that naturally seals off the wound from the inside out, preventing pathogens from entering the plant’s vascular system. This is the plant’s own perfect, breathable bandage.
Applying a thick, tar-like sealant over the cut interferes with this vital process. Instead of protecting the wound, these sealants trap moisture against the wood surface, creating the ideal dark, damp environment for fungal spores to germinate and thrive. The sealant can crack over time, allowing water and pathogens to seep in and become trapped, promoting wood rot that you cannot see until it is too late. The practice has fallen so far out of favor that recent pruning surveys indicate that only 1 in 4 gardeners now seal rose cuts, reflecting a shift toward evidence-based horticulture.
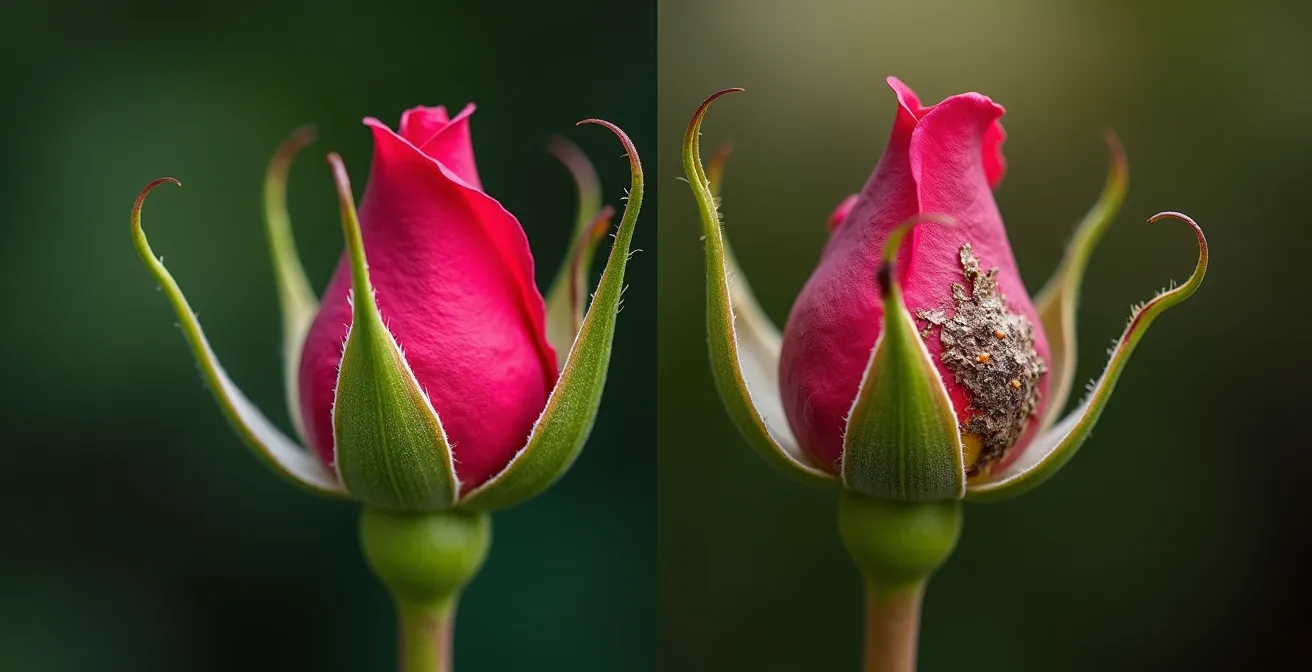
As this comparison shows, the unsealed stem on the left is healing cleanly, forming a natural collar of callus tissue. The stem on the right, coated with an old pruning paint, is trapping moisture and beginning to decay from within. The science is clear: let the plant heal itself. Your job is to make a clean, sharp cut at the right location—just above an outward-facing bud—and then step away. Even the long-held belief in a specific angle is being questioned, as noted by one of the world’s top authorities.
Accepted wisdom suggests cutting just above a leaf joint with a sloping cut away from the bud. However, there is no evidence to prove this is necessary.
– David Austin Roses Pruning Guide, David Austin Roses Official Care Guide
Why You Get No Apricots if You Prune Off the Spurs?
While the title mentions apricots, the principle is universal and absolutely critical for many types of roses, especially climbers and old-fashioned shrubs: you get no flowers if you prune off the flowering spurs. These are not just random bumps on a stem; they are specialized, short, stubby, and often gnarly-looking structures that form on older wood (two years or more). These spurs are the plant’s dedicated flower factories. Each year, they produce the buds that will become your cherished blooms. A new gardener, aiming for a “clean” look, often mistakes these vital structures for useless old wood and prunes them off, effectively sterilizing the plant for the upcoming season.
This is a devastating error born from an inability to read the plant’s anatomy. A rose cane has two types of buds: pointed, slender leaf buds that will produce vegetative growth, and plumper, often fuzzier flower buds found on the spurs. Removing the wood that carries these spurs means you are removing 100% of the potential flowers on that section. The plant may still produce new long canes (vegetative growth), but you will have a season with plenty of leaves and no blooms. The secret to a flower-laden climbing rose is to preserve this framework of old, spur-laden wood and only prune the shoots that grew from it last season.
Distinguishing between these structures is easiest in late winter, just as the buds begin to swell. This is another powerful argument against autumn pruning, when everything is dormant and harder to identify. The Royal Horticultural Society’s trials have quantified the benefit of this patience: their guidelines, which advocate for pruning in late winter, help gardeners reduce accidental spur damage by a staggering 75%. Preserving these spurs is not optional; it is the entire point of pruning for flowers.
Powdery Mildew: How to Stop It Spreading to Your Cucumbers?
Poor pruning practices, especially in autumn, do not just affect the rose itself; they create a breeding ground for diseases that can spread to other vulnerable plants, like cucumbers, squash, and phlox. Powdery mildew is a prime example. This fungal disease appears as a white, dusty coating on leaves, stems, and buds. It thrives in the exact conditions that define a temperate autumn: high humidity at night and mild daytime temperatures. In fact, plant pathology research shows that high humidity and 10-25°C temperatures create ideal conditions for its spores to germinate and spread.
A poorly pruned rose bush—congested with too much weak growth and dead leaves—is a perfect incubator. The lack of air circulation traps moisture, allowing the fungus to establish itself. Autumn winds then carry these spores throughout your garden. The first line of defense is cultural: rigorous garden hygiene. You must remove and destroy all fallen leaves from around your roses, as the fungus can overwinter on this debris. Furthermore, proper thinning cuts that open up the plant’s center are your best preventive measure, as they promote airflow and allow leaf surfaces to dry quickly.
If an infection does take hold, you must act decisively. There are two main categories of fungicides: contact and systemic. Contact fungicides, like horticultural oil or potassium bicarbonate, work on the surface of the plant and must be reapplied regularly, especially after rain. They are best for immediate knockdown of a visible infection. Systemic fungicides are absorbed by the plant and offer longer-lasting protection from within, making them an excellent preventive measure if you know your plants are susceptible.
This table compares common treatments to help you choose the right strategy.
| Fungicide Type | Application Method | Duration | Best Use Timing |
|---|---|---|---|
| Contact (Potassium Bicarbonate) | Spray on visible infection | 7-10 days | Immediate knockdown |
| Contact (Horticultural Oil) | Full coverage spray | 5-7 days | Early infection stage |
| Systemic (Propiconazole) | Soil drench or foliar | 14-21 days | Preventive before symptoms |
Open Center Pruning: How to Get Sun into the Middle of Your Peach Tree?
The ultimate goal of pruning many shrubs, from peach trees to hybrid tea roses, is to create a strong, open-centered or “vase-like” structure. This is not just for aesthetics; it is a fundamental strategy for maximizing plant health and productivity. A congested center with crossing branches blocks sunlight from reaching the inner leaves, reducing the plant’s overall photosynthetic capacity. More importantly, it traps stale, humid air, creating the perfect microclimate for fungal diseases like black spot and powdery mildew to flourish. As experts continually advise, airflow is paramount.
Aim to create an open-centred framework to encourage good air-flow through the plant.
– BBC Gardeners’ World, BBC Gardeners’ World Rose Pruning Guide
Achieving this structure requires a disciplined use of thinning cuts. The process begins by selecting three to five strong, healthy main canes that are well-spaced around the base of the plant. These will form the main “scaffold” of your vase. All other canes growing from the base, especially any weak, spindly ones or those growing into the center of the plant, must be removed completely. You then prune the branches growing off your main scaffold, always removing any that are growing inwards. The goal is to create a structure where, in theory, a bird could fly through the center of the bush without touching a leaf.
This open structure also contributes significantly to the plant’s structural integrity, particularly in preventing “wind rock.” Tall, dense, unpruned roses act like sails in winter gales, causing the plant to rock back and forth. This constant movement loosens the roots in the soil, creating air pockets and damaging the fine root hairs responsible for water and nutrient uptake. The result is a severely weakened plant that struggles to establish itself in the spring. A light autumn pruning to reduce height by one-third is one of the few acceptable forms of autumn cutting, specifically for this purpose.
Case Study: Preventing Wind Rock Damage
A study by Hayloft Gardens provided stark evidence of this danger. They documented that tall roses in exposed locations that were reduced in height by one-third in autumn showed 60% less wind rock damage over the winter. In contrast, the unpruned control group suffered significant root loosening, which led directly to poor spring growth and a 40% reduction in flowering the following season. This demonstrates that a tactical, minimal autumn prune for height reduction is a valid protective strategy, distinct from the damaging hard prune that stimulates growth.
Hedges vs Fences: Which Protects Delicate Plants Better from Wind?
Protecting your roses from the elements is as important as pruning them correctly. Wind is a major enemy, not only for causing the ‘wind rock’ that damages roots, but also for desiccating (drying out) the canes and buds, especially during winter when the ground is frozen and the plant cannot replace lost moisture. Many gardeners erect solid fences as a windbreak, but this is often a counterproductive strategy. A solid barrier does not stop the wind; it deflects it. This creates intense turbulence on the leeward (sheltered) side of the fence, which can be even more damaging to plants than a steady, uninterrupted wind.
The superior solution is a living windbreak, such as a dense hedge. Unlike a solid fence, a hedge doesn’t block the wind—it filters it. The complex structure of branches and leaves slows the wind down, reducing its velocity by 50-60% while avoiding the creation of damaging eddies and turbulence. Furthermore, a hedge creates a more favorable microclimate. It increases local humidity and moderates extreme temperature swings, providing a gentle, sheltered environment that benefits not only your roses but also a host of beneficial insects. While it requires more maintenance than a fence, the protective benefits are far greater.
The choice of barrier has a significant impact on the health of the plants behind it. A solid fence is a one-time installation, but its effect on the immediate environment can be harsh. A hedge is an ongoing commitment, but it creates a softer, more integrated, and ecologically richer garden environment. For the dedicated gardener, creating these buffered zones is part of the holistic approach to plant care.
This comparative table breaks down the key differences between these two common forms of protection.
| Barrier Type | Wind Reduction | Microclimate Effect | Maintenance Cost |
|---|---|---|---|
| Dense Hedge | 50-60% wind filtering | Increases humidity, moderates temperature | Annual pruning required |
| Solid Fence | Creates turbulence behind | No climate moderation | One-time installation |
| Mixed Planting | 40-50% graduated protection | Creates beneficial insect habitat | Seasonal maintenance |
Deadheading: How to Get a Second Flush of Flowers in Late Summer?
Deadheading—the act of removing spent flowers—is a common practice to encourage a second or even third flush of blooms. By cutting off the dying flower, you prevent the plant from putting energy into producing seeds (in the form of rose hips) and instead redirect that energy into making more flowers. This works beautifully throughout the summer. However, continuing this practice into the autumn is the same biological betrayal as hard pruning. It is another signal that tells the plant to keep growing when it should be preparing for its dormancy cycle.
As autumn approaches, a rose plant naturally responds to the shortening days and cooler temperatures by slowing down. Allowing the last flush of flowers to mature into rose hips is a crucial hormonal signal that tells the plant, “The season is over. Prepare for winter.” The formation of hips triggers the process of hardening off woody growth and entering a state of deep dormancy that will protect it from freezing temperatures. If you continue to deadhead into September and October, you are overriding this signal. You are telling the plant to produce more flowers, which stimulates the fatal new growth that will be killed by frost. This leads to significant winter dieback and a weakened plant.
The negative impact is not theoretical; it is a measurable vulnerability. In colder climates, the effect is particularly pronounced. According to cold climate studies that show roses deadheaded after September in USDA zones 6 and below suffer up to 30% more winter damage than those left to form hips. Your deadheading shears are just as powerful a signaling tool as your pruning shears. You must learn when to use them, and more importantly, when to put them away. For most rose types, all deadheading should cease by late August or early September to allow the plant to begin its essential winter shutdown.
Key takeaways
- Autumn pruning is a fatal mistake because it breaks the rose’s natural dormancy cycle, stimulating new growth that is immediately killed by frost.
- Masterful pruning relies on sterile tools, understanding the difference between thinning and heading cuts, and preserving flowering spurs on older wood.
- Stop all deadheading by early autumn to allow the plant to form hips, which is a crucial hormonal signal to prepare for winter.
Therefore, the final word on pruning is one of respect for the plant’s natural rhythms. By working with its biological clock, not against it, you ensure not just survival, but a garden that thrives with spectacular health and beauty. For a comprehensive plan, start by assessing your roses and identifying the specific pruning strategy each one needs for the upcoming late-winter season.