In summary:
- Bad compost smells are specific microbial distress signals, not a sign of total failure.
- An ammonia smell means too much nitrogen (greens); the immediate fix is adding more carbon-rich browns.
- A rotten egg smell means no air (anaerobic); the solution is to turn and aerate the pile immediately.
- Indoors, you can prevent pests by freezing food scraps and always burying them under a thick layer of bedding.
- The right fix always starts with accurately “reading” your pile’s unique signs to diagnose the root cause.
You started your compost pile with the best intentions: turning kitchen scraps and yard waste into black gold for your garden. But now, instead of a sweet, earthy aroma, you’re greeted by a foul odor that has you questioning the whole endeavor. It’s a common frustration for eco-conscious homeowners who find their compost bin has turned into a stinky, rotting mess. You’ve likely heard the standard advice—add more brown materials or turn the pile—but often, these generic tips fail to solve the underlying problem.
The truth is, your compost pile is a living ecosystem, and that smell is a specific distress signal from the billions of microbes doing the work. The problem isn’t just that it “smells bad”; the key is understanding *what* it smells like. An ammonia-like odor tells a completely different story than a putrid, rotten-egg stench. What if the secret to fixing your compost wasn’t just random guesswork, but learning to read these signals like a master composter?
This guide will teach you to move beyond the platitudes and become a compost diagnostician. We will decode the different smells to pinpoint the exact imbalance in your pile. By understanding the microbial processes at play, you’ll learn how to apply precise, effective fixes that transform your smelly problem into a thriving, odor-free system that consistently produces rich, valuable compost for your garden.
text
This article provides a comprehensive roadmap for troubleshooting your compost and related garden systems. Below is a summary of the key areas we will explore to help you cultivate a healthy and productive garden ecosystem.
Summary: A Guide to Diagnosing and Improving Your Garden Ecosystem
- Carbon vs Nitrogen: What is the Golden Ratio for Fast Compost?
- Worms in the Kitchen: How to Compost Indoors Without Fruit Flies?
- Straw vs Bark: Which Mulch Prevents Weeds Better in Vegetable Beds?
- Is Rain Barrel Water Safe for Your Lettuce and Strawberries?
- Compost Tea: When Should You Brew It for Maximum Effect?
- Gypsum: The Miracle Mineral That Loosens Clay Without Changing pH?
- Why Tilling Your Soil Kills the Micro-Organisms That Feed Your Plants?
- How to Improve Clay Soil Drainage Without Digging Forever?
Carbon vs Nitrogen: What is the Golden Ratio for Fast Compost?
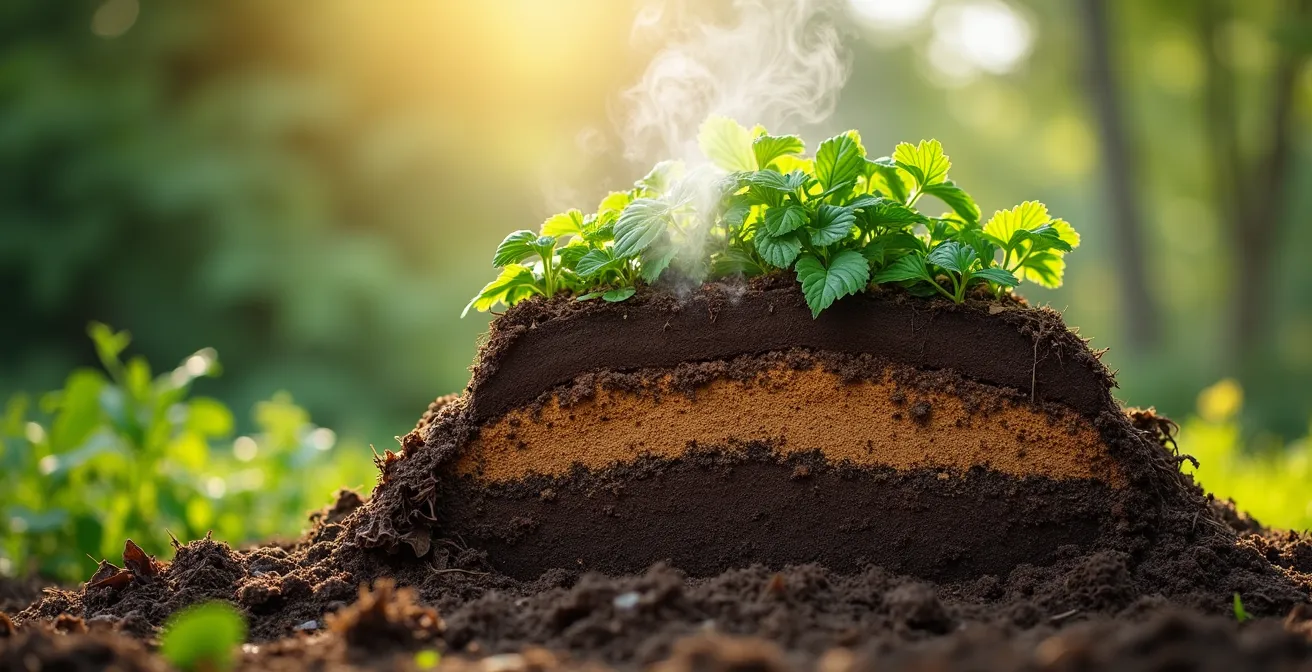
The heart of successful, odor-free composting lies in balancing two key ingredients: carbon and nitrogen. Carbon-rich “browns” (like dried leaves, straw, and cardboard) provide energy for decomposer microbes, while nitrogen-rich “greens” (like kitchen scraps and grass clippings) provide the protein for them to grow and multiply. For the fastest, most efficient decomposition, scientific research points to a specific target. In fact, Cornell University’s composting research confirms that the ideal C/N ratio is approximately 30 parts carbon to 1 part nitrogen by weight.
But you don’t need a laboratory to get it right. Your nose is your best diagnostic tool. The smell your pile emits is a direct message about its C/N balance. If your pile smells sharply of ammonia, like a dirty hamster cage, it’s a clear sign of excess nitrogen. The microbes have more protein than they can use, so they’re releasing the extra as ammonia gas. The fix is simple: add more browns and turn the pile to mix them in. Conversely, if your pile smells putrid or like rotten eggs, it has gone anaerobic—meaning it lacks oxygen. This often happens when a pile is too dense with wet greens. The solution here is to turn it thoroughly to introduce air and break up clumps.
A pile with too much carbon won’t smell bad, but it will be painfully slow to decompose. The key is to think of your compost not as a waste bin but as a recipe. By learning to “read” the smells, you can adjust your ingredients and management style to keep your microbial workforce happy, healthy, and working efficiently without the stink.
Your 5-Point Compost Health Check
- Smell Test: Stick a shovel into the center and take a whiff. Earthy is good. Ammonia means too many greens (add browns). Rotten eggs means no air (turn it).
- Moisture Check: Grab a handful and squeeze. It should feel like a damp, wrung-out sponge. If water drips out, it’s too wet (add browns). If it’s crumbly and dry, it’s too dry (add water).
- Temperature Reading: If you have a compost thermometer, check the core. A hot pile (130-160°F / 55-70°C) is actively working. A cold pile may be too dry, too small, or lacking nitrogen.
- Visual Inspection: Look for a mix of materials. If you can only see one thing (e.g., all grass clippings), the pile is unbalanced. Ensure there’s a good blend of green and brown textures.
- Aeration Assessment: Are there dense, slimy layers? This is a sign of compaction and lack of oxygen. Break up these layers with a pitchfork to restore airflow.
Worms in the Kitchen: How to Compost Indoors Without Fruit Flies?
Vermicomposting, or composting with worms, is a fantastic way to handle kitchen scraps indoors without the need for a large outdoor pile. However, the fear of one tiny pest—the fruit fly—stops many people from trying it. The key to a pest-free worm bin isn’t about reacting to an infestation, but proactively creating an environment that is inhospitable to them from the start. It begins with how you feed your worms. A simple and highly effective strategy is to freeze your food scraps before adding them to the bin. This not only kills any existing fruit fly eggs and larvae but also helps the worms by breaking down the cell walls of the food, making it easier for them to eat once it thaws.
Beyond freezing, managing the surface of your worm bin is critical. Always bury new food scraps under a few inches of existing bedding (the worm’s carbon-rich home, made of shredded paper or coco coir). After burying the food, cover the entire surface with a loose, dry sheet of newspaper. This creates a physical barrier that prevents fruit flies from smelling and accessing the food. This bedding layer is more than just a cover; it acts as a natural biofilter, absorbing odors and maintaining a balanced environment. Keeping the bedding fluffy and plentiful ensures the bin remains aerobic, a condition fruit flies dislike.
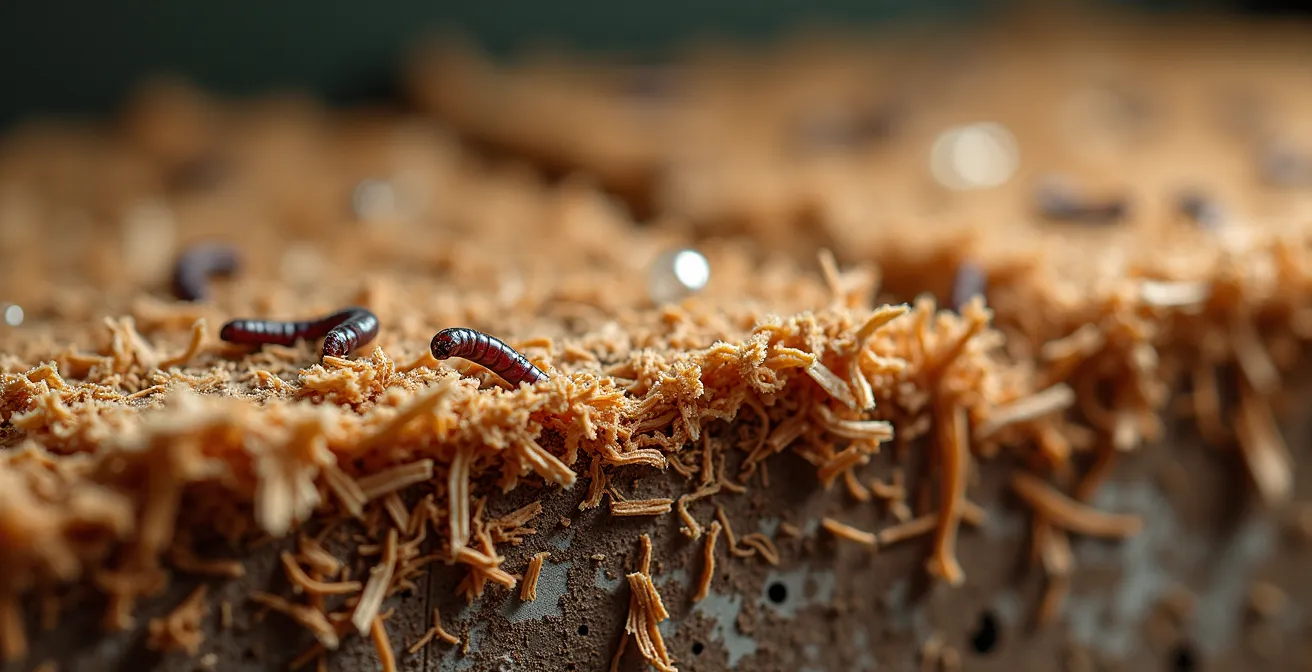
As you can see in this cross-section, a thick bedding layer isn’t just filler; it’s a structural component of a healthy bin. It provides air pockets, absorbs excess moisture, and creates the biofilter that keeps your kitchen free of unwanted visitors. By implementing this feeding and bedding strategy, you can enjoy all the benefits of indoor composting without the annoyance of fruit flies.
Straw vs Bark: Which Mulch Prevents Weeds Better in Vegetable Beds?
Choosing the right mulch for your vegetable garden is about more than just aesthetics; it’s a strategic decision that impacts weed suppression, soil health, and even pest management. The two most common organic options, straw and bark, function very differently because of their chemical makeup. Straw is a “fast carbon,” while wood-based mulches like bark are “slow carbons.” Understanding this difference is key to matching the mulch to your garden’s needs.
This is because different types of plants thrive in soils dominated by different microorganisms. As the Cornell Composting Research Team explains, the type of carbon you add influences this balance:
High-lignin ‘slow carbons’ (woodchips) build fungal-dominant compost for perennials, while low-lignin ‘fast carbons’ (paper, straw) create bacterial-dominant compost for annual vegetable gardens.
– Cornell Composting Research Team, Cornell Composting Chemistry Guide
This insight is critical. Your annual vegetables (like tomatoes, lettuce, and squash) prefer a bacterial-dominant soil, which is exactly what straw helps create as it breaks down quickly. Bark, on the other hand, decomposes slowly and fosters a fungal-dominant soil, which is ideal for perennial plants, shrubs, and trees. Using bark mulch in an annual vegetable bed can temporarily “steal” nitrogen from the soil surface as it decomposes, potentially stunting your young plants. The following table breaks down the key differences to help you decide.
| Property | Straw Mulch | Bark Mulch |
|---|---|---|
| Decomposition Speed | Fast (high-carbon, low-lignin) | Slow (high-lignin) |
| Soil Building | Feeds soil quickly | Promotes long-term fungal networks |
| Pest Habitat | Can harbor slugs and snails | Refuge for beneficial predators |
| Nitrogen Impact | Minimal nitrogen draft | Can temporarily ‘steal’ nitrogen |
| Best Use | Annual vegetables | Perennial plantings |
Is Rain Barrel Water Safe for Your Lettuce and Strawberries?
Harvesting rainwater is an excellent sustainable practice, but when it comes to watering edible plants, caution is warranted. Water collected from a roof is not sterile. It can pick up contaminants, from bird droppings to pollutants, which may include harmful bacteria like E. coli. While the risk is often low, it’s not zero, especially for leafy greens or fruits that are eaten raw. The concern is that these pathogens can survive on plant surfaces. For instance, a 2021 study on contaminated irrigation water found that E. coli can persist on lettuce for over a week, posing a potential health risk.
This doesn’t mean you should abandon your rain barrel. It means you should adopt safer watering practices to mitigate the risk. The number one rule is to avoid watering the edible parts of the plant. Instead of spraying the leaves of your lettuce or the berries on your strawberry plants, apply the water directly to the soil at the base of the plant. Using soaker hoses or drip irrigation is an ideal way to achieve this, as it delivers water straight to the root zone where it’s needed most and keeps the foliage dry.
You can further improve water quality at the source. Installing a “first-flush” diverter is a smart move; this device diverts the initial flow of water from your roof, which is typically the most contaminated, away from your barrel. The material of your roof also matters, with metal roofs generally being safer than asphalt shingles, which can leach petroleum compounds. By combining these smart harvesting and watering techniques, you can confidently use your rain barrel water to support your garden while keeping your produce safe.
Compost Tea: When Should You Brew It for Maximum Effect?
Compost tea is not a fertilizer in the traditional sense. It’s a liquid, living inoculum of beneficial microorganisms brewed from high-quality compost. Its primary purpose is to boost the “soil food web” and protect plants. As soil science pioneer Dr. Elaine Ingham famously stated, the right perspective is key to using it effectively.
Compost tea is not plant food, but an army of beneficial microbes being deployed to protect plant surfaces and enhance nutrient cycling in the soil.
– Dr. Elaine Ingham, Soil Food Web School
Understanding this concept transforms the question from “what to feed” to “when to deploy.” The timing of compost tea application is strategic, designed to give your plants a microbial advantage at critical moments. One of the most effective times to use it is during transplanting. A soil drench of compost tea around the roots of a new seedling helps reduce transplant shock and immediately establishes a protective colony of beneficial microbes to ward off pathogens.
Another key window is during the plant’s active vegetative growth phase. Applying the tea as a soil drench provides a natural nutrient boost by enhancing the nutrient cycling capabilities of the microbes already in the soil. It can also be used as a foliar spray, particularly after a rain, to cover leaf surfaces with beneficial organisms that can outcompete potential fungal pathogens like powdery mildew. Just as with mulch, you can even tailor your tea: brew a bacterial-dominant tea using worm castings for your annual vegetables, and a fungal-dominant tea from mature, woody compost for your trees and perennials to match their soil preferences.
Gypsum: The Miracle Mineral That Loosens Clay Without Changing pH?
For gardeners battling heavy, compacted clay soil, gypsum (calcium sulfate) is often touted as a miracle cure. It promises to loosen the soil and improve drainage without altering the soil’s pH, unlike lime. While it can be highly effective, its “miracle” status comes with a major caveat: it only works on a specific type of clay. Wasting time and money applying gypsum to the wrong soil is a common and frustrating mistake. The key is understanding the soil chemistry it targets.
Gypsum’s magic lies in a chemical process called flocculation. It is most effective on sodic clays, which are soils with high levels of sodium. In these soils, the calcium in gypsum displaces the sodium attached to clay particles. This action causes the tiny, tightly packed clay platelets to clump together into larger aggregates, creating better soil structure and pore space for air and water to move through. However, if your clay soil’s structure problem is caused by compaction, low organic matter, or a magnesium imbalance—and not high sodium—gypsum will have little to no effect.
Case Study: The Importance of Soil Testing Before Applying Gypsum
Research consistently shows that gypsum’s effectiveness is tied to soil composition. It is primarily effective on high-sodium sodic clays, where the influx of calcium ions forces clay particles to flocculate, creating larger, more stable aggregates and dramatically improving pore space. On the other hand, studies demonstrate that gypsum has very little structural effect on non-sodic clays or soils whose poor drainage is due to other issues like simple compaction. Therefore, conducting a soil test to determine your soil’s sodium content is an essential first step. Applying gypsum without this data can lead to wasteful treatment of a non-responsive soil, with no improvement in drainage.

This microscopic view shows the process in action—transforming a dense, impermeable structure into one with channels for roots and water. Before you invest in bags of gypsum, invest in a simple soil test. It’s the only way to know if this mineral will be a miracle for your specific garden or simply a wasted effort.
Why Tilling Your Soil Kills the Micro-Organisms That Feed Your Plants?
For generations, tilling or “turning over” the garden bed has been the standard way to prepare for planting. It feels productive—breaking up clumps, removing weeds, and creating a fine seedbed. But below the surface, this annual ritual is a destructive event for the very ecosystem that feeds your plants. Your soil is not just dirt; it’s a complex habitat teeming with billions of microorganisms, fungal networks, and earthworms, collectively known as the soil food web. Tilling shatters this delicate structure.
When you till, you pulverize the soil aggregates that these microbes have carefully built. You shred the intricate, thread-like networks of mycorrhizal fungi that extend plant root systems and ferry nutrients and water. This sudden, massive exposure to oxygen sends the soil bacteria into a feeding frenzy. They rapidly consume the soil’s organic matter, releasing a huge burst of carbon dioxide into the atmosphere and depleting the long-term carbon reserves that are essential for soil health and structure. It creates a short-term nutrient boost but leads to long-term degradation.
A far more sustainable and ultimately more productive approach is “no-till” or “no-dig” gardening. Instead of destroying the soil structure from within, you build it from the top down. The most common method is sheet mulching or “lasagna gardening.” This involves layering organic materials directly on top of the soil. You can start by laying down a layer of cardboard to smother existing weeds, followed by a thick layer of compost, and finished with a top dressing of mulch like straw or wood chips. You can plant directly into the compost layer, and over time, these layers decompose, feeding the soil life and building rich, healthy topsoil without ever disturbing the world below.
Key takeaways
- Your compost’s smell is a diagnostic tool: ammonia means too much nitrogen, rotten eggs means no air.
- Successful composting hinges on the 30:1 carbon-to-nitrogen ratio, which can be managed by balancing “browns” and “greens.”
- No-till methods like sheet mulching build superior soil health by protecting the delicate microbial ecosystem that feeds your plants.
How to Improve Clay Soil Drainage Without Digging Forever?
Transforming heavy clay soil is a marathon, not a sprint. The idea of endlessly digging and amending can feel overwhelming, but a permanent solution doesn’t come from a single action. It comes from an integrated, multi-year strategy that works *with* nature to build better soil structure from the top down and the bottom up. Instead of fighting the clay, your goal is to create the conditions for soil life to do the heavy lifting for you. This approach combines strategic amendments, biological action, and raised structures to create a thriving garden bed on top of even the most stubborn clay.
The first year is about setting the stage. After a soil test (to see if gypsum is needed), your main tool is organic matter. Apply a thick layer of compost (4-6 inches) directly on top of the clay. Then, plant deep-rooted cover crops like daikon radishes, alfalfa, or chicory. These plants act as “bio-drills,” driving their powerful taproots deep into the compacted clay. When they die, their roots decompose in place, leaving behind permanent channels for water and air, and adding organic matter deep within the soil profile.
In subsequent years, you build on this foundation. Constructing modest raised beds (8-12 inches high) on top of the amended area and filling them with a high-quality soil and compost mix gives your plants an immediate zone of friable soil to establish themselves in, while their roots continue to penetrate the improving clay below. Maintaining a permanent layer of mulch on all your beds is crucial. This top-down feeding continuously nourishes the earthworms and microbes, who will work year after year, pulling organic matter down into the clay and slowly but surely transforming it into a rich, well-draining, and fertile loam. It’s a patient process, but it’s a permanent solution.
By learning to diagnose your compost’s signals and applying these sustainable, ecosystem-based practices to your soil, you can move from a place of frustration to one of confident mastery. Start today by observing your garden’s unique conditions and choosing one small, targeted action to begin building a healthier, more resilient system.